
Custom Search
Basic Supplies
- Joint compound
- White paper sheetrock tape
- Sheetrock square
- Metal screen
- Crack Cover
- Box knife
- Tape knife or wall trowel
- Plastic tray for mixing compound
- Repair fabric
- Drill
- Sheetrock screw
- Scissors
- Pencil
- String
Repairing holes
.
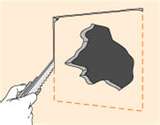
- Measure and cut a small square of sheetrock at least three inches bigger than the hole.
- Hold the square over the hole and trace it with a pencil.
- Score the pencil lines with a box knife then cut through the sheetrock.
- Insert your finger into the hole and pull the sheetrock out. It should just crumble away. Continue until the square is a nice, clean opening.
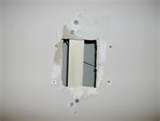
- Cut a strip of 1"x1" wood long enough to slip into the square opening and extend behind the sheetrock above and below the opening.
- Secure the wood strip to the sheetrock with a screw on the top and bottom
- Now insert the sheetrock square into place, covering the wood strip.
- Secure the square to the wood strip with one screw in the center.
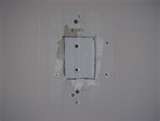
- Mix up some joint compound. Then using a wall trowel or tape knife, spread it like cake frosting over the square. Be sure to push the compound into the joint between the old and new sheetrock.
- Tear off a length of white tape long enough to cover the bottom of the patched area.
- Spread joint compound over it.
- Tear off a second length of tape and place it over the top of the patch.
- Spread joint compound over the tape.
- Continue the process until the hole is patched. (allowing the compound to dry in between coats)
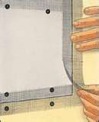
- After the compound has thoroughly dried, sand it smooth, texture the area and paint it with a finish coat.
Repairing hairline cracks
- Cut a strip of self-adhesive repair fabric slightly longer than the length of the hairline crack.
- Press it firmly over the crack until it adheres.
- Spread a coat of joint compound over the fabric.
- Let the coat dry thoroughly, then repeat until the crack is now longer visible. Be sure to let each coat dry before applying another.
- Sand the dried compound smooth.
- Texture the wall. (if applicable)
- Paint the wall.
TIP: If you want to be sure the hairline crack won’t reappear, spray it with an even coat of "Crack Preventer" before you texture the repaired area. It sprays on like paint, but dries like rubber. If there is any shifting or settling in your wall, this sealant will stretch, rather than crack like standard caulk. After the 'Crack Preventer' has dried, you can texture and paint the repaired area.
